Editorial Note: We earn a commission from partner links on Doughroller. Commissions do not affect our authors’ or editors’ opinions or evaluations. Learn more here.
Switching banks can be a hassle, particularly when it comes to your checking account. Changing savings accounts is easy–just move your money from one bank to another. But with a checking account, you have to consider direct deposit, automated payments, and even ordering new checks. To help, we offer our simple guide on how to change banks.
A Simple Guide to Changing Banks
1. Choose Your New Bank
Once you’ve decided to make the change, it’s time to find a new bank and open an account. Here it’s important to consider what features you want in a bank. I’ve always preferred large, national banks for my checking account. I like the convenience of a nearby branch, even if I rarely need to use it. I also like a nationwide ATM network.
Bright Idea
Avoid large, national banks for your savings account as they tend to pay low rates. Online banks often offer much higher APYs.
That being said, there are a number of excellent checking account options. Many charge no monthly maintenance fee and offer a solid mobile app. Of course, you may not be able to find the 100% perfect solution here, so you may need to rank your criteria and settle for the lesser of several evils.
2. Change Your Direct Deposits
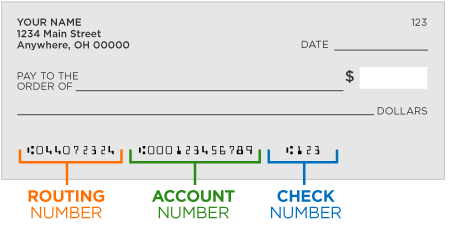
After you open your new checking account, you’ll need to update your direct deposit information. Your employer will have the forms necessary to do this. You’ll need to routing number and bank account number of your new account. The routing number identifies your new bank, while your account number identifies your specific checking account.

Remember to change all direct deposits you have set up to the new account. You may receive government benefits via direct deposit. For example, here are the instructions for updating direct deposit for Social Security benefits. These will need to be changed as well.
3. Re-establish Links to Other Accounts
After you’ve talked to your employer about direct deposit, you’ll need to work your way through your other financial institutions and re-establish any linkages that will be broken when you finally close your old account. This could include links between your bank and an investment broker, an online savings account, PayPal, and other financial accounts.
4. Move Your Billpay Transactions
Now that you won’t have any money flowing into your old account, you better make sure you’re not still paying bills from there. Go through your billpay interface and move everything over to the new account. You should also be sure to check for auto-debits. For example, the company that picks up our trash auto-debits our checking account every three months.
Another big area, and one that’s easy to miss since they may only take out money once per year, is things like life insurance premiums. In some cases, you’ll need to make these changes through the payee instead of through your bank, so devote some time to getting these things sorted out.
Here’s a list of some of the most common bills that allow automated payments from your bank accounts.
- rent or mortgage.
- power bills (electricity or gas).
- telephone bills (landline and mobile phone).
- water and sewer bills.
- property taxes.
- income taxes, if you have enrolled in the Electronic Federal Tax Payment System (EFTPS) or your state’s electronic payment system.
- car, home, and life insurance.
- other insurance payments.
- credit card bills.
- payments to student loans.
- payments to car loans.
5. Get New Checks
In most cases, you’ll get a free set of starter checks from your new bank. But if you don’t, or if you don’t get enough, you’ll need to buy some yourself. In general, it pays to shop around. While I’ve recently been able to get free checks from our bank, it wasn’t always this way. In fact, it’s often far cheaper to buy checks online than through your bank.
6. Sit and Wait
Ahhh. Everything is now done. Right? Well, hopefully. But maybe you missed something, so it’s best to sit and wait to be sure that all of your transactions are hitting your new account, and that you didn’t forget anything.
It’s also important to double-check that all of your checks have cleared. You’ll obviously want to leave a cash cushion during this process in case anything pops up.
7. Connect Your Apps
You may have multiple apps that download your bank transactions. The most common is a budgeting app. In our case, we use several apps that track our budget as well as our investments. You’ll want to identify the apps you use and link them to your new bank account.
8. Close Your Old Account
This is the most unnerving step because there’s always a chance, no matter how small, that you forgot something. After you’ve waited a few months and are satisfied that your old account is now totally dormant, go ahead and take the plunge. Draw your balance down to zero and close your account.


